Start streaming with OBS
Prerequisites
Section titled “Prerequisites”- OBS Studio installed on your computer
- An AT Protocol account (same as your Bluesky account) for logging in to Streamplace
- Web browser
Basic Setup Instructions
Section titled “Basic Setup Instructions”1. Get your Stream Key from Streamplace
Section titled “1. Get your Stream Key from Streamplace”- Open your web browser
- Visit Streamplace and log in to your account
- Navigate to the Live Dashboard
- Click “Stream from OBS”
- Select either
RTMP(preferred) orWHIP. - Click “Generate Stream Key”
- The stream key will automatically be copied to your clipboard
2. Configure OBS Studio
Section titled “2. Configure OBS Studio ”2a. Initial OBS Configuration
Section titled “2a. Initial OBS Configuration”- Launch OBS Studio
- Navigate to Settings > Stream
2b. Stream Settings
Section titled “2b. Stream Settings”- Return to OBS Settings > Stream
- Configure the following:
- Service:
- If using
RTMP, selectCustom.... - If using
WHIP, selectWHIP.
- If using
- Server:
- If using
RTMP:rtmps://stream.place:1935/live - If using
WHIP:https://stream.place
- If using
- Stream Key (for RTMP) or Bearer Token (for WHIP): Paste your copied stream key
- Service:
2c. Output Configuration
Section titled “2c. Output Configuration”- Go to OBS Settings > Output
- Configure these settings:
- Output Mode: Select “Advanced” from dropdown
- Navigate to Streaming Tab
2d. Streaming Settings
Section titled “2d. Streaming Settings”- Audio Encoder:
- For
RTMP, choose an appropriate AAC encoder. - For
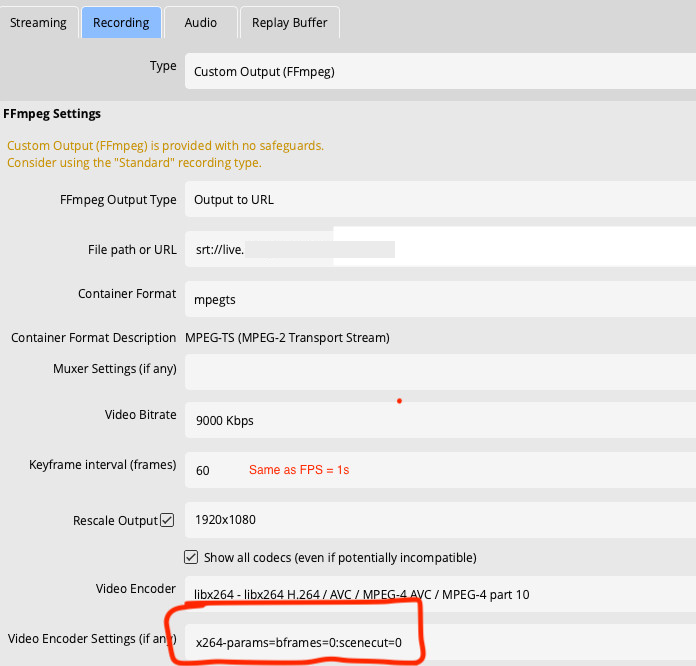
WHIP, useffmpeg_opus. - If you are using a server that supports the SRT protocol (e.g. multistreaming via NGINX) please check below for an example config.
- For
- Video Encoder: (Select appropriate encoder, e.g. libx264/nvenc_h264)
2e. Suggested Video Encoder Settings
Section titled “2e. Suggested Video Encoder Settings”- Video Encoder: x264/h264 (must be an x/h.264 encoder)
- Rate Control:
CBR - Keyframe Interval:
1s- This is one keyframe per second
- In some situations (e.g. ‘keyframe interval (frames)’), this should be set to your FPS.
- x264 Options:
bframes=0- If available, there also may be a ‘bframes’ checkbox which should NOT be checked
3. Announce your stream
Section titled “3. Announce your stream”- Once you’re live, go back to the live dashboard.
- There, you can fill out your stream title and choose an optional thumbnail.
- Click ‘Announce Livestream’ to announce your livestream to the world!
Multi-Streaming Support
Section titled “Multi-Streaming Support”OBS supports multi-streaming through two available OBS plugins:
-
OBS Resources - Multiple RTMP Outputs
Best Practices
Section titled “Best Practices”- Test your stream settings before going live
- Monitor your stream health during broadcasts
- If you see lots of dropped frames, lower your bitrate.
- Ensure stable internet connection
- Keep your OBS software updated
Additional Resources
Section titled “Additional Resources”Example Settings
Section titled “Example Settings”
Multistreaming via a server that supports the SRT protocol
